musings of a daft gardener

All content ©

“When the world wearies and society ceases to satisfy, there is always the garden.” Minnie Aumonier

Latest

Gardening in Winter: One Off-Season Chore

This may sound like Christmas in July, but gardening in winter is an important step in making your garden the best bed it can be.

Here’s why.

In winter, especially in upstate New York where our temperatures are practically Arctic, we can’t actually get organic replenishment into the soil without drills and flame throwers.  And frankly, I’m just not handy with a flame thrower – maybe you’d have better luck.  Most people abandon the beds until spring.  Which can work just fine.  However, you can still fortify your future beds all winter long.

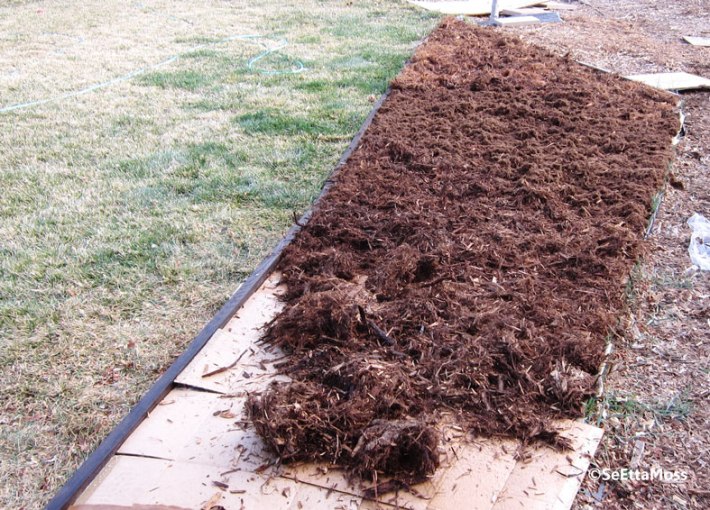
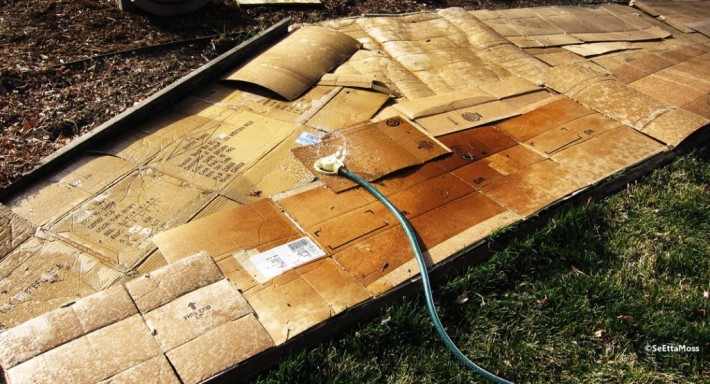
As best you can, rake or shovel your plot space even.  Once you have flattened out your space, place a tarp or some other more earth friendly layer over your space.  (I like cardboard – it’s easy to find and disintegrates by planting time.  I’ve seen leaching fabric, blankets, you name it.)  When you have your cover over your plot, adorn the cover with several good-sized stones or cement block or pieces of firewood that will keep the cover down when the wind blows.  Snow will come along soon enough and give you your secondary cover.

Why?

1)  This primary cover will prevent the majority of weeds to take root and sprout in your planting area.  This makes tilling your soil in the spring a snap and you are already ahead on the weeds before you’ve planted a single seed.

2)  You have created a surface to collect manure, compost, topsoil or any other number of sources of additional organic material to add to your plot.  Just keep piling it on during the winter.  The pressure the organic materials places on the cover you have put down will decrease the weed growth under your tarp to nearly ZERO.

3)  If you used cardboard as your cover, you can easily dump your manure, mulch, top soil or whatever you’ve found right on top.

Image

Image

If you have a cover such as leaching fabric or a tarp you need to move portions of the enriched material off the tarp as you roll it inward taking more material off each roll you make until you’ve completely transplanted the manure directly onto your plot.  Also remember if you have used leaching fabric you do not have to remove this as it allows water to flow through to the dirt.  You can artfully cut holes into the fabric where you can transplant a start.  This strategy helps keep weeds down through the growing season.

Now: the big question — how do you get crap, literally!  My best means of finding manure is to take a ride out on one of GF lonely highways.  Look for a home with animals.  There’s nothing wrong with heading up to their doors and asking if they have extra manure to get rid of.  9 times out 10 the answer is yes.  They generally have trucks for hauling stuff and if you bring a shovel and help load the #2 magic…you’ll quickly find yourself schlepping the brown gold everyone needs in their garden beds.  (Here’s a hint: don’t go on days when it is below freezing.  Crap sticks to the ground and is hard to load.  Wait til a day above freezing, preferably in the 40’s.)
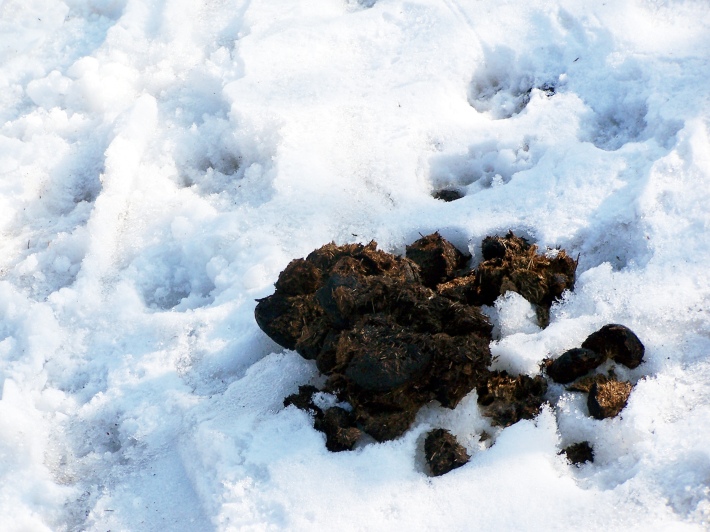
ImageBecause it is always about the poop when it comes to gardening….
Pancetta and Sprouts

Brussels Sprouts are making their way onto the scene in many gardens.  The heads probably aren’t ready to cut, but the bottom leaves should be trimmed and the buds should be starting to develop.  The plants are very cool looking – I think they modeled Audrey II from Little Shop of Horrors after the developing Brussels Sprout.

But I digress…

I love Brussels Sprouts.  I love bacon.  I love this recipe!

This is a recipe that does not involve spice as it draws on the bitter of the sprouts, the savory/salty loveliness of the pancetta and the sweet of the raisins.

It has everything…it’s like eating New York City, without the pee smell.

  • 1/4 cup olive oil
  • 12 oz pancetta or thick cut bacon
  • 3 lbs. Brussels sprouts, trimmed and cut in half
  • 1 1/2 cup golden raisins
  • 1 cup chopped walnuts
  • 2 1/2 chicken stock

In a large sauce pot heat the oil on medium.  Add pancetta and cook about 15 minutes until all the fat is rendered (I know, gross).  You need to stir this frequently as it renders.  Pluck out with slotted spoon onto plate with paper towel.  Once you’ve removed pancetta, turn the heat up high and add Brussels sprouts.  (OK…I said no spice, but at this point you can add course Kosher salt and as much ground pepper as you like – also cayenne if you want some SNAP to it.)  Cook the sprouts until lightly browned – about 5 minutes.  Add raisins, walnuts and chicken stock.  Reduce to simmer for about 10 minutes or until everything is tender.

Now, if you want to send this over the edge, right before you set this out on the table – dress with a drizzle of balsamic vinegar and shavings of Parmesan or Asiago cheese.

PS.  If anyone is 100% convinced they know the proper placement, or non-placement, of the apostrophe in Brussels or Brussel’s Sprouts — please Reply and tell me.

Tandoori and Masala

Thank you Paula at LakeSchooling for the simple reminder of something so wonderful!

What is Tandoori?  Besides – FAAABULOUS – tandoori recipes and cooking comes from the name of the cylindrical clay oven used in southern and central Asia.

There aren’t many of these types of stoves used in cooking in the United States.  Fire regulations make them impossible, or impractical, and cooking in them is an art. An art I SO don’t have — but the process of using the tandoor lead to an entire realm of cooking called Tandoori.  Traditional naan bread is made this way — can you imagine the art of getting the dough just right to stick to the sides and being dextrous enough to handle the pats of naan as they cook!  Only in my dreams.

But – and I have a really big but – I LOVE the flavors of Tandoori masala, the mix of spices traditionally used in a Tandoori masala.

Making the masala is really simple.  All you need are the spices and a coffee grinder.  Acquiring the spices can be a ton of fun, but if you don’t shop around it can get really expensive.  Thankfully there are a couple of really good online options.  If price is not a problem, I love Penzeys (thank you kitchen goddess Ellen Woodhouse).  They have everything and it is top-notch stuff.  Plus their photos give good references for what it is you are actually identifying.  For example – I had NO idea what an actual nutmeg nut looked like before I started making Tandoori masala.

Here is what you will need (generally) to make a traditional garam masala used inmost Tandoori cooking:

  • coriander seeds (4 parts)
  • peppercorns (2 parts)
  • caraway seeds (2 parts)
  • cardamom seeds w/o husk (1 part)
  • cumin seeds (1 part)
  • cloves (1 part)
  • cinnamon stick (1 part)
  • nutmeg nuts (1 part): 1 oz bag should be about $3 and will last you a VERY long time (3 whole nuts)
  • mace blades (1 part)
  • star anise or regular anise* same pricing as nutmeg – very potent spice won’t need much!
  • fennel seeds *
  • marati moggu*: this is pricey
  • bay leaves*

Here’s what stuff looks like.

* These spices are in the family of masala spices.  I generally do not use them in my grinds.  This is just personal taste and because I am a cheap skate!

The recipe above is done in parts.  This means you control how big a part is – based on how big of a batch you want to make.  The parts above if blended together will be enough to make an enormous bowl of mixed veg or rub 2 whole chickens.

The best part of making masala is the prep.  Put the parts you have collected above into the oven and warm on low until you can smell them in the house.  Let yourself take in the aroma — it is MESMERIZING!!  When the spices and seeds are toasty warm then set to blending them in the coffee grinder — make sure you have cleaned your grinder!! I have a coffee grinder I use only for spices.  You don’t want coffee grounds in your masala.

Now you have your masala.  Put it into any spice jar, like you would any other spice.  When you want to use the masala you can rub onto meats directly, or mix with an olive oil to brush on vegetables, or some mix the masala with plain yogurt and bake with fish.  Taste as you go adding cayenne to dry rubs or chile sauce to oil or yogurt preparations.  There are no hard and fast rules — experiment and make your own discoveries!

A very cool Tandoor site that explains a lot more about the actual original type of tandoor stove and how to make and use them: Click Here.

Also, there is an old movie with Denzel Washington in it named Mississippi Masala that talks about what a masala is – good flick to get on Netflix or Red Box.

The Rocky Hornworm Picture Show

I was so bummed this morning as I was doing my morning walk through of the garden.

I found a HORN WORM!!

And then I found something else…

The little green guy was COVERED in teensy white cocoons.  It was both amazing and kinda gross.

These little cocoons are good news I found out, well as good news goes when it comes to finding a horn worm in your prize heirlooms bushes.  Here’s what I found out about these little guys.

“The female Braconid wasp uses her ovipositor to lay eggs just under the skin of an unlucky hornworm. As the eggs hatch, the larvae feed on the hornworm’s viscera–literally eating a hornworm alive. Larvae chew their way out through the host’s skin when they mature.

Once outside, the future wasps pupate, spinning tiny oval cocoons that look like insect eggs along the external back and sides of the worm. These fellows–and ladies–are not just innocently hitching a ride. When the adult wasps emerge from the cocoons, the already weakened hornworm will soon die, thus preventing any further defoliation on tomato plants.

So, if you see a bright green hornworm carrying what looks like a clutch of white-colored insect eggs on its back, leave it there! The hornworm is not only feeding its own destruction, it is also carrying potential destroyers of hornworm brothers, sisters and descendants. That means we get those wonderful, luscious tomatoes right off the vine, the braconids get a meal and a future, and the hornworms get…GONE!”

Link to more info.

I couldn’t bring myself to leave this horn worm on its own.  I had to listen to every cell in my body when it said GET THEE GONE!  So I’ve given the worm a proper burial and pruned back the vegetative branches on the bushes a bit to allow for better worm hunting — because you know there are more!  Only this time if they come adorned with their own cocoon factory I will leave them be.  Promise.

Curse Words!

The Heirlooms are Early !

I prepped and planted the same way I have for the past two years – my journal from last year says these heirlooms are a good three weeks early!  I think it has been far drier, but I’ve got a great well that flows daily.  Great season.  This is one of 15 plants…going to a good canning season.  [Giggles to self!]

.

.

.

.

.

.

.

.

.

.

Here are the babies I started from saved seeds and transplanted in late May.

.

.

.

.

.

.

.

.

.

.

I prune all vines that are 12 inches up the stalks.  I prune the non fruit branches hard until the fruiting branches are heavy with blossoms.  This tends to produce a lot of healthy fruit.  I tie vines onto wood stakes and lattice with twine.

I’ve also got Roma, yellow pear and German striped toms going.

Thanks for checking in!

Basil Anchovy Sauce

Image

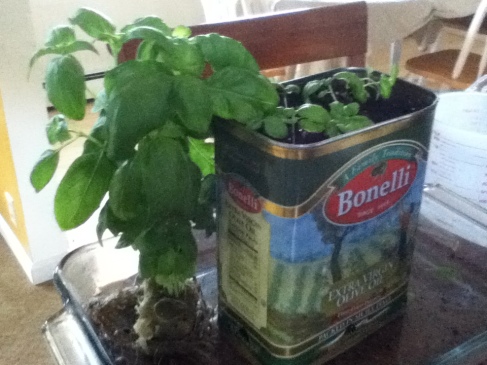
What a sheer delight this herb is.  Not only is it scrumptuous to cook with and to eat…it is a pretty, verdant plant to boot.  Sexy and smart!  The photo above is of a canister of olive oil that I turned into a repository for the few basil shoots I didn’t have room for outside, as well as a hydroponic basil plant I bought in the store.  Both are being watered form below by sitting in a glass baking dish that I keep putting water in…for that constant, small supply I use when just nancying about my kitchen.

This week I was fortunate enough to get some very beautiful steaks from a friend in exchange for some gardening work.  I pan seared the steaks in olive oil, garlic, salt, pepper and tobasco.  I allowed them to cool and cut them into very thin slices, that were still rare, and put them in a bowl.  Along with the steak strips I threw in finely chopped red onion and about eight basil leaves cut up into thin strips.  I sprinkled some sea salt over the top and let them marinate in the fridge.

The next day, I tossed the marinated steak strips back into an oiled pan until all sides were seared and then folded them into naan bread with some horseradish and the sauce this blog post is about…CRAZY GOOD.

Basil Anchovy Sauce

Again, as cooking SHOULD be….this is terrificly simple but at the same time merrily explodes with flavor!

Ingredients

  • 3 cloves of garlic, smashed of chunkly chopped
  • 6 filets of anchovy – the teensy things from the tin
  • 1/4 walnut
  • Tablesoon of capers – or more if you really like that bite!
  • 2 tablespoons of bread crumb…add more if you want your sauce to be a paste
  • 1 1/2 cups basil leaves
  • 1/2 cup parsley
  • 2 tablespoons white wine vinegar
  • 1/8 Teaspoon Freshly Ground Pepper
  • 1/2 – 3/4 Cup Olive Oil

Instructions

  1. Add all ingredients, except olive oil, to the bowl of a food processor.
  2. Begin to process the ingredients and slowly drizzle in the olive oil.
  3. Continue adding olive oil until the desired consistency is reached.

The beauty of this — put it EVERYWHERE!  On top of fish, in stir fry, dip bread into it, marinate a steak in it…the list is endless. And it is so frickin’ easy!

And again, don’t miss these other two good basil concoctions.

How to make margaritas with basil: http://wp.me/p1xZTa-7m.

How to make basil soup: http://wp.me/p1xZTa-1z.

Homemade Mayonnaise

This is one of those times when “Where have you been all my life?” strictly applies.  Thank you Nancy from the Greenwich Free Library!! One of the simplest recipes ever brings an old time condiment into the gourmet era.  Add extra pepper, or garlic, or any herbs for a flourish.  Try this….it’s really AWESOME!

  • 1 large egg yolk, at room temperature 30 minutes
  • 1/2 teaspoon Dijon mustard (I left this out of one batch and it was good too)
  • 3/4 cup olive or vegetable oil (or a combination), divided (some recipes recommend safflower oil)
  • 1 teaspoon white-wine vinegar or cider vinegar (Balsamic turns this recipe pink!)
  • 1 1/2 teaspoons fresh lemon juice
  • 1/4 teaspoon white pepper

Whisk together yolk, mustard, and 1/4 teaspoon salt until combined well. Add about 1/4 cup oil drop by drop, whisking constantly until mixture begins to thicken. Whisk in vinegar and lemon juice, then add remaining 1/2 cup oil in a very slow, thin stream, whisking constantly until well blended. If at any time it appears that oil is not being incorporated, stop adding oil and whisk mixture vigorously until smooth, then continue adding oil. Whisk in salt to taste and white pepper. Chill, surface covered with plastic wrap, until ready to use.

The 12 Minute Dinner

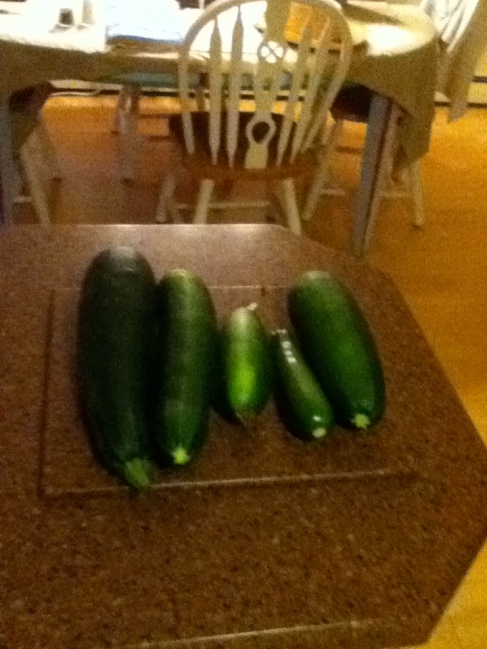
The zucchini are knocking on your door about now.  This is my favorite time of year. I could live all year long on these beasts. Go pluck some of the larger zucchini, rinse off and make 1/2+ inch slices.


Image

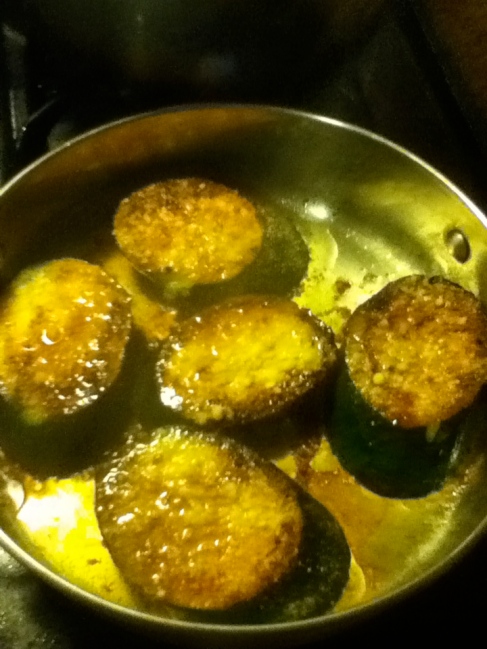
Put about 3 tablespoons of good olive oil in a skillet.  Turn on low.  Flip the slices a few times so they are all oily.  Sprinkle tamari sauce in the pan, salt and pepper over the top of the matter.  Saute for about 3 minutes and flip.  Sprinkle some asiago and red chile peppers on this side and cover.  Let them simmer for about another 3 minutes.

Image


Throw them on a plate and devour!


If you do not like tamari (soy) think about different flavors you can use: sesame, walnut, or keep it simple with evoo.  Praise be the zucchini…

Zesty Sweet Zucchini Relish

This recipe comes from an online gardening club friend of mine: Staci Shearer Sage.  She’s a rockin gardener from Pennsylvania with a lot of great ideas…

Zesty Sweet Zucchini Relish
(Makes five pints jars or 9 jelly jars for smaller portions)

12 cups finely chopped zucchini
4 cups chopped onions
2 red bell peppers, seeded and chopped
1 green bell pepper, seeded and chopped
1/3 cup pickling or canning salt
2 1/2 cups granulated sugar
2 1/2 cups white vinegar
I tbsp ground nutmeg
I tbsp ground turmeric
4 tbsp prepared horseradish (optional)
I chili pepper, including seeds, chopped (optional)

I. In a large glass or stainless steel bowl, combine zucchini, onions, red and green peppers and pickling salt. Cover and let stand in a cool place (70 to 75°F/21 to 23°C) for 12 hours or overnight. Transfer to a colander placed over a sink and drain. Rinse with cool water and drain thoroughly. Using your hands, squeeze out excess liquid.

2. In a large stainless steel saucepan, combine drained zucchini mixture, sugar, vinegar, nutmeg, turmeric, horseradish and chili pepper. Bring to a boil over medium-high heat, stirring occasionally. Reduce heat and boil gently, stirring frequently, until liquid is reduced and mixture is the consistency of a thin commercial relish, about 45 minutes.

3. Meanwhile, prepare canner, jars and lids.

4. Ladle hot relish into hot jars, leaving 1/2 inch headspace. Remove air bubbles and adjust headspace, if necessary, by adding hot relish. Wipe rim. Center lid on jar. Screw band down until resistance is met, then increase until tight without tightening all the way.

5. Place jars in canner, ensuring they are completely covered with water. Bring to a boil and process for 15 minutes. Remove canner lid. Wait 5 minutes, then remove jars, cool and store.

I didn’t have Red peppers available, so I used Yellow. Horseradish and Chili Peppers are optional, if you like a kick at them. I don’t so I omitted.

Cilantro Lime Dipping Sauce

It’s that time of year when cilantro makes a lovely debut. Cilantro is one herb that needs clipping or it will bolt faster than a drag queen at a GOP caucus meeting.  You want to prevent the stems from getting too long, you want shorter stems with more leaves…cuz we likey the leaves!

1 cup packed cilantro leaves (stalks are okay if you are using a food processor)

1 clove garlic

1 jalapeno (if you are like me and like a few tears with your appetizers – otherwise skip this)

1/4 cup lime juice or one lime completely demolished lime

3 teaspoons balsamic vineager

1/2 cup extra virgin olive oil

2 cups non-fat sour cream (you honestly cannot tell the difference from regular sour cream with this sauce)

2 teaspoons raw ginger (this is optional, it just gives it an extra crisp edge).

Enjoy this with toasted pita, veggy sticks or as a compliment to any fish entree.  It is also amazing with tacos or as a dressing for a baked potato. (or if you’re really gross….just by the spoonful!)